Welcome I am a fellow member of 'Team Go For Gold' :)


Tuesday, 11 January 2011

PLANNING: Creating a schedule for principle photography in London

Before our group undertakes our principle photography in London, Kate and I used our storyboard to create a schedule for our filming. I created a list of all the shots that we need to undertake in this location and together we created a table which stated the location, the type of camera shot and what is happening in the shot. This enables us to know what we will be shooting when we go to our different locations which will save sufficient time and make sure that nothing is forgotten.

This also enabled me to plan our routes to get to each of the different locations which will make sure we know exactly when and where we are going, therefore no time will be wasted from a lack of understanding during filming.

Here is part of the schedule that Kate and I created for when we go filming up London next week.

Monday, 10 January 2011

DEVLOPMENT- Website

Today I fully completed two of my web pages within my website. These pages are my home page and the band's biography.

I created a slideshow using Adobe Flash which consists of three images for a new album box set, new merchandise and a quote from Kerrang Radio magazine. In addition, I completed the featured articles on this page which consist of text hyperlinks to the 'News' page.


Additionally by obtaining my results from researching into Kings of Leon's history I could rewrite the biography and create a fact file about them. Plus, I imported a video which shows the behind the scenes of their most recent music video (my main text).

Saturday, 8 January 2011

DEVELOPMENT - Editing of our principle photography begun!

Today Vanessa, Kate and I started editing our footage from principle photography. We grouped our footage together into folders so that it was all organised accordingly. We had specific folders for the different scenes throughout our music video, and within these we created additional folders to group together the good and bad footage so that we knew which clips should be imported into Adobe Premiere Pro when we began editing.


Today we completed the editing of one scene of our music video, this included cutting and cropping the footage, however we have not added any transitions yet. We have not completed our principle photography yet, we still have filming to undertake in London, however as the editing can be done non-linearly we could begin editing one of the middle scenes in our video.

RESEARCH - Developing my skills for Adobe Premiere Pro

Before me and my team started using Adobe Premiere Pro to edit our footage, I wanted to ensure I knew how to use it and develop some new skills. I have previously used this software but not in enough detail to have the necessary skills for our task.

For previous work I learnt how to cut footage, add video transitions such as cross fade and also speed the video up. There are other elements that we want to incorporate into our work such as video effects which includes zooming and cropping. Additionally I wanted to learn more about the sound effects that can be used on this software and hopefully use this in our own work.

In order to learn these skills I looked on YouTube and also found tutorials for Adobe Premiere Pro on the Internet.


I looked at a tutorial which demonstrated what trimming did on Adobe Premiere Pro and how it is done.
I am going to use transitions in my music video and therefore learnt how to add a transition to footage to enable me to perform this skill. 

I have discovered that when using video effects in this software, the use of key frames is very common and therefore felt I needed to widen my understanding on the concept to enhance my skills. For example, when adding a zoom, key frames are added to indicate where you want the zoom to start and end and can then be altered to create the zoom you would like. Learning what the key frames do for the different aspects has enabled me to learn how to zoom using Adobe Premiere Pro.

I also viewed a tutorial on how to fade in and out. This has enabled me to learn how this can be achieved and can now incorporate this into my video if I need to.

Wednesday, 5 January 2011

DEVELOPMENT - Using Adobe Photoshop to edit photos

I am going to use this photo as my background image for my website. However before doing this I edited it by giving it a tint to match the colour of my background and then I faded it to make it suitable for my background.

I opened a new document with a plain white background.

I changed the background colour by using the fill tool and selecting the background colour of my website which is #75858f.

I then opened the image that I want to use as my background image and dragged it on top of the coloured background.

From here i changed the opacity of the image which enabled me to add a tint to the image because this faded the image and allowed the coloured background to be shown through the image.

Here is the final edited image which I can now use as my background image for my website.


DEVELOPMENT - Principle photography continued

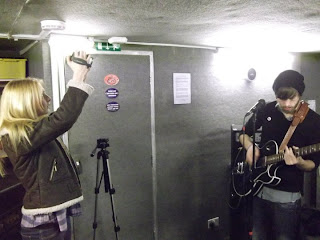
We continued with our principle photography and went to Banana Road Studio to film footage of a band performing in a studio. Using a studio enabled us to film our shots consisting of drums, a bass guitar and a lead guitarist. We arranged 3 new models to use for our band who owned the guitars which they brought to the studio and they also knew how to play the song we have chosen (Use Somebody).


For our filming we used:
·         Two video cameras
·         Two tripods
·         Dolly
·         Stills camera


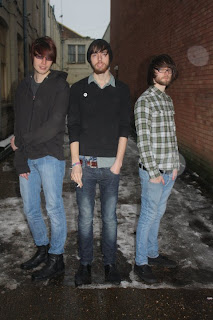
We also undertook photography at the studio which enabled us to create our band photos. For these photos we used the lighting in the studio and the others were using daylight because we took them outside. I will use these photos for my website I am currently producing, in addition I may use them for the stickers that I am also creating as part of my ancillary task.

I plan to use Adobe Photoshop to edit some of the photos to fulfil the design of my website. I have been using the help guide to learn new skills and familiarise myself with the software before I plan to use it because it has been a long time since I last used it.

Here are some of the photos that we took:


Monday, 3 January 2011

DEVELOPMENT - Organising our footage

Before we began to edit our footage we arranged all of our footage accordingly to ensure it was organised and each of the files could be imported easily and be stored appropriately.

After uploading our footage from the studio between us me and Kate organised our footage. Kate renamed each of the files so we knew exactly what they were which will made the editing process quicker, and I created individual folders for each of our different locations. Together this enabled us to organise all of our footage and from here we could import the footage based on the locations and work on each different section at a time.


This is an example of the different file names within our 'Studio footage' folder which clearly states what each of the files are. For example ' whole song handheld' means we know this footage is the one we filmed by handheld and therefore we know what footage this is before we import it into Adobe Premiere Pro to start editing.